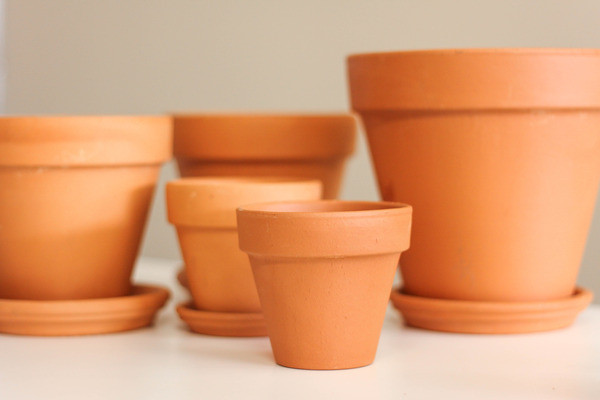
Terra cotta (terracotta, terra-cotta) is the Italian word for “baked earth” and humans have been cooking with it since before recorded history. Its that inexpensive earthenware red clay pottery sold at nurseries and garden centers. Terra cotta is ideal for baking because it absorbs and distributes heat much more evenly which will make your baked goods turn out better. Pizza ovens (“brick ovens”) are lined with ceramics for this same reason. Before modern metal cookie sheets and loaf pans became fashionable in the 20th century, humans baked on ceramics.
Ovens Are Bad at Keeping Temperature
The heat in your oven turns on and off many times while baking, resulting in wildly uncontrollable temperate swings. Even the most accurate oven will swing a minimum 40 degrees F from what you have it set to. If set to 350, your food is actually baking at between 330 – 370 degrees F, and most ovens are even worse. Having someone calibrate your oven’s thermostat or buying an oven thermometer are useless tips. Baking with terra cotta helps to even out those temperature variations; when the heat is off the ceramic is still releasing steady heat, when the heat is on the ceramic is absorbing that excess heat. Every oven also has hot and cold spots, which terra cotta will lessen the impact of. Your baked goods prefer a more steady, constant heat.
Pizza Stones
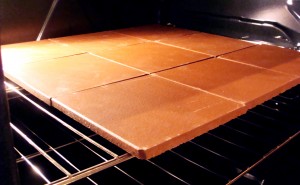
Terra cotta tiles (also called quarry tiles) can also be purchased from a tile shop or home improvement store. Four dollars worth of unglazed 1/2″ terra cotta tiles laid out on the bottom rack of your oven will do the same job as a $47 pizza stone.
Measure your oven rack before going to the tile store. The tiles are available in
differing sizes from 6X6″ up to 16X16″. The thicker the better, but always get  unglazed terra cotta. Put one of the oven racks at the very bottom position, then lay your tiles on it, side-by-side (after seasoning them, details below). If you feel inclined, you can lean some tiles up against the sidewall of your oven vertically, and put another layer on the rack above, making a sort of “brick-lined oven” around your baked goods.
Cooking pizza on terra cotta will give you a fantastic crust like you’ve never had before at home. You will need to preheat the oven to its highest temperature (450-500 degrees) for 45 min to an hour — with the tiles/stones in place — before putting the pizza directly onto the tiles. Bake your pizza for 5-7 minutes. A pizza paddle is helpful for quickly getting the pizza onto and off of the stones.
Feel free to leave the tiles in your oven forever; no need to remove them (except to wash them off occasionally — see cleaning below).
Saucer Instead of a Cookie Sheet
Use just the saucer (bottom piece, water catcher) of an unglazed, unpainted, terra cotta pot from a nursery or home improvement store. Get one that’s at least 11″ diameter or larger, with a flat smooth inside surface (some may have ridges on the inside which is not workable). Most saucers are the same depth as a conventional pie plate. Works great for baking pie, or use instead of a cookie sheet for baking breads, cookies, scones, and biscuits.
Pots Instead of a Loaf or Cake Pan
Use small unglazed, unpainted, terra cotta pots in place of a loaf or cake pan for baking bread, cakes, or brownies. Cut a circle of parchment to cover the hole on the inside bottom. Obviously if you need a flat cake then stick with a conventional cake pan, but 6oz-8oz ceramic pots makes for great individual-sized desert cakes or brownies. Eat it right out of the pot. Any standard bread or cake recipe will work, or boxed cake mix. As usual insert a toothpick to know when the cake is done.
Prepare the Terra Cotta Ceramic Before Use
Unglazed ceramic is porous, so you’ll want to season it (create a non-stick barrier) much like you do with a cast iron skillet, in fact the process is nearly identical.
- Use a scrub pad on the ceramic to remove any small burs.
- Submerge in water and soak the ceramic overnight.
- Wash the pottery thoroughly with water (no soap), or run it through your dishwasher (again, no soap). Soap will soak into the ceramic leaving a bad flavor.
- Place in a 200 degree F oven for 10 minutes, or until its bone dry. Cool.
- Using a food-grade oil/grease (vegetable oil, Crisco, lard) pour some onto a clean cotton cloth or paper towel, then rub it all over your pottery, coating thoroughly. This process will change the color of your ceramic, so if you prefer to only apply oil to the top/inside (where the food will be) then that’s fine too, but for uniformity I suggest to oil the whole thing on all sides.
- Using a clean cloth or paper towel, wipe it all off until it looks dry. The oil will have penetrated the pores, but you don’t want drips or excess on the surface. You may be tempted to leave a thicker coat of oil on it — this will not speed up the process, but will leave drip marks and a non-uniform coating.
- Place the pottery upside down in a cool oven (let it preheat with the oven), and bake at 450 degrees F for one hour. There should not be any drips if you wiped it down properly. After the hour, turn off the oven (do not open the door to check on it) and let it cool for two hours. Remove. The ceramic will be darker. Note: there will be smoke from the oil burning, which is WHAT YOU WANT. (I am not telling you to take down your kitchen smoke alarm during this process, but I did.) Its the burning of the oil that creates the hard glazed non-stick coating. Over time the seasoned coating will continue to darken, especially on the top side where the baked items sit. This is good; you want that glaze. Even though its dark, this is not “dirt” and doesn’t need to be scrubbed off.
- While its not absolutely necessary, the more you season it, the better the results will be, so if you have the time and the ambition then you can do steps 3-5 as much as five more times. There is no harm in using your terra cotta after only one seasoning.
- Always lightly oil/grease the terra cotta before baking with it (just the top part that will be touching the food).
Cleaning Your Terra Cotta Ceramics
To clean the ceramic simply wipe it down with a damp rag or sponge and rinse. If very dirty, soak in clean water (no soap), then wipe clean. If you only use it for baking breads and such then it shouldn’t get dirty enough to need any more than a gentle rinse. Avoid excessive scrubbing or soap, and do not run through the dishwasher as this will remove the seasoned coating and the soaps/detergents can absorb into the porous clay which may alter the taste of the food.
A Note About Lead
Some rumors and uninformed people say that unglazed terra cotta contains lead and should never be used for baking. This is false. Terra cotta is safe for cooking food (even Martha Stewart bakes with terra cotta). Pottery manufacturers do not add lead to their clay. Glazed pottery may have lead in the glazing compound paint, which is why we urge you to only use unglazed, and season it properly (above). However, since terra cotta is made from earthen clay, and the earth has trace amounts of lead naturally, it is possible for terra cotta to have a minute trace amount of lead in it (just as the dirt in your backyard might). If you are very concerned, you can purchase a lead testing kit from a home improvement store to set your mind at ease, available in the paint section. Additionally, even if there are trace amounts of lead, it won’t leech into your food unless the food is highly acidic, such as citrus. Lead won’t float around in the air or leap onto your food when heated. For baking, its a non-issue. Lastly, you can always lay some parchment paper under your baked goods if you’re still concerned.
Terra cotta ceramic pottery are probably the least expensive item in your kitchen, but will perform better than the most expensive cookware, and will last you many years if properly cared for. Almost any baked item will turn out better on terra cotta, and look damn sexy doing it!
Disclaimer: this article may contain affiliate links.

