The Best Family Halloween and Thanksgiving Movies

Published Thursday, October 8th, 2015

The Best Family Halloween and Thanksgiving Movies

One of our favorite holiday traditions as a family is when we get to pull out the seasonal movies (and books) from storage and enjoy some classic programming together.  When I was a kid (and perhaps many of my readers as well) the only time we got to watch a holiday special was the one night when they played it on TV.  Obviously kids today can watch them limitless, so we at least put them away once the holiday is over to give these specials the feeling of actually being “special”.

Here is a list of the best Halloween and Thanksgiving movies and specials that you can watch as a family.  No horror or blatant adult themes.  If you don’t already have all of these, each title below is a link that will show you where you get get a copy for yourself.

Let us know in the comments below which ones your family enjoys most.

Family Halloween Specials

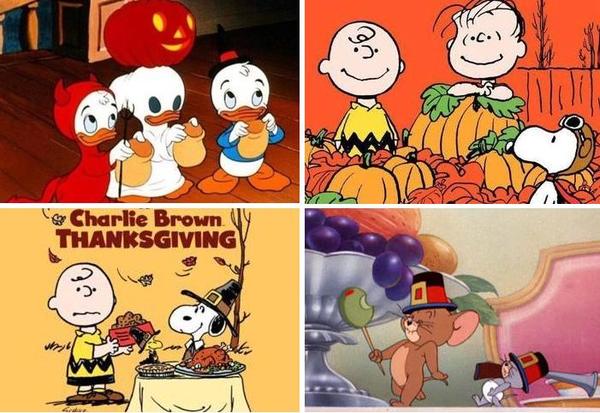
Its The Great Pumpkin, Charlie Brown (1966)
The Peanuts gang celebrates Halloween, with Linus hoping that, finally he will be visited by The Great Pumpkin; while Charlie Brown is invited to a Halloween party.  This fits the truest definition of a classic: its as enjoyable for kids of today as it was in 1966 when it was first released.  All ages.

The Aventures of Ichabod (aka The Legend of Sleepy Hollow) (1949)
A retelling of Washington Irving’s story.  Ichabod Crane, the new schoolmaster, falls for the town beauty, Katrina Van Tassel, and the town Bully, Brom Bones, decides that he is a little too successful and needs “convincing” that Katrina is not for him.  Bing Crosby lends his pipes to this Walt Disney masterpiece in a unique format as storyteller and singer.  This was originally released as a double-feature, so the first half of the movie is “Mr. Toad/The Wind In The Willows”.  Skip past that to get to the Ichabod feature.   May be frightening for children under 5.

Ghost Busters (1984)
Three odd-ball unemployed scientists setup shop catching ghosts in New York City and end up stumbling upon a gateway to another dimension.  This 80s comedy adventure still entertains adults and children alike.  May be frightening for children under 10.

Coraline (2009)
An adventurous girl finds a doorway to another world that is a strangely idealized version of her frustrating home, but it has sinister secrets.  This claymation rendition of Neil Gaiman’s book of the same name is visually tantalizing and surprisingly creepy, even for adults.  May be frightening for children under 9.

Hocus Pocus (1993)
After three centuries, three witch sisters are resurrected in Salem Massachusetts on Halloween night, and it is up to two teen-agers, a young girl, and an immortal cat to put an end to the witches’ reign of terror once and for all.  May be frightening for children under 8.

Halloweentown (1998)
The Cromwell clan split their time between the real world and “Halloweentown”, but the son of an old rival threatens to make the latter “real” and the real world a place of monsters.  May be frightening for children under 7.

Trick or Treat – Donald Duck (1952)
After Donald Duck plays a cruel Halloween prank on his nephews, the 3 team-up with a witch and her broom to teach him a lesson about ‘tricks and treats.’  This short cartoon is only runs 8 minutes, but its become a traditional family Halloween special for several generations.  Unfortunately the Disney Company has not released it for sale, but its available for viewing on YouTube.  All ages.

Flying Sorceress – Tom and Jerry (1956)
Tom gets a job being a witch’s cat and has a frightening ride on her broomstick.  Another animated classic like Trick or Treat (above), this 6 minute short is available on the Tom and Jerry Spotlight Collection DVD.  All ages.

Halloween also mentions, for the wee little ones…

The above list is easily enjoyable for children and adults of all ages.  Here is a list especially for the little kids, which adults may not want to sit through.

Curious George: A Halloween Boo Fest (2013)
Halloween is almost here and George can’t wait for the festivities to begin: carving pumpkins, costume contests, and especially the Annual Boo Festival.  All ages.

Berenstain Bears: Halloween Treats (2009)
The furry clan returns with jack-o’-lantern adventures that will make your bones tingle with fright and delight!  All ages.

Thomas and Friends: Halloween Adventures (2009)
Celebrate Halloween with Thomas and his friends…tricks and treats abound!  All ages.

Family Thanksgiving Specials

There are much fewer Thanksgiving specials available.  I suppose Hollywood just hasn’t managed to make this holiday entertaining, which is kind of a shame because I personally really love Thanksgiving.  Here are the best ones that we like to watch.

A Charlie Brown Thanksgiving (1973)
Peppermint Patty invites herself and her friends over to Charlie Brown’s for Thanksgiving, and with the help of Linus, Snoopy, and Woodstock, he attempts to throw together a Thanksgiving dinner for the gang.  All ages.

This is America Charlie Brown – The Mayflower Voyagers (1988)
The Peanuts Gang reinacts the Mayflower Voyage in an historical context.  This is available on the same disc as A Charlie Brown Thanksgiving (above).  All ages.

The Little Orphan – Tom and Jerry (1949)
The orphan mouse, Nibbles, spends Thanksgiving with Jerry, but Jerry’s cupboard is bare.  The mice partake of Mammy’s Thanksgiving feast while Tom tries to catch them.  This 8 minute animated short won an Academy Award that year.  All ages.

Holiday Inn (1942)
At an inn which is only open on holidays, a crooner and a dancer vie for the affections of a beautiful young performer.  Although this is often lumped in with Christmas movies, it spans all the holidays of the year, and includes a Thanksgiving segment.  Stars Bing Crosby and Fred Astaire.  This is the movie that the song White Christmas was written for.  (Fun fact: White Christmas is the best selling song of all time.)  All ages, although young kids may find it boring.

What are your favorite holiday specials?  Did I miss any?  Leave a comment below!

Related: Mommy Perfect’s list of The Best Family Christmas Movies

Disclaimer: this article may contain affiliate links.

Top 12 Kitchen Tools

Published Friday, September 18th, 2015

Top 12 Kitchen Tools

Leaving aside the obvious essentials such as a stove, fridge, sink, pots and knives, etc — without which you don’t have a kitchen, but a college dorm room — here are the Top 12 kitchen tools, appliances, and utensils that you may not own or not realize how useful they are.  Starting from the bottom:

12. Tongs
Many people only use tongs when BBQing, but I use mine daily.  Turning over baking meats, grabbing baked potatoes, removing hard boiled eggs, or even to slide out the oven rack without having to put on an oven mitt.

11. Bodum Press Pot (french press coffee maker)
To brew the perfect cup of coffee at home you need to use a Bodum.  If you drink loose leave tea, it will make that process easier as well.  Fresh hot cider, to filter out the spices.  Herb infused oils, to catch the bits of herbs.

10. Coffee Grinder
If you want to brew the perfect cup of coffee, a good coffee grinder is more important than the coffee making device.  Beans need to be freshly ground and uniform in size.  A burr grinder is ideal; even a manual burr grinder is better than a blade grinder, but if a blade grinder is all you have that’s still better than drinking stale grounds.  You can also use your grinder to make freshly ground spices — all your recipes will pop.  Stale spices are like stale coffee beans or stale anything else.  You’ll never buy ground spices again.

Related: How to Brew the Perfect Cup of Coffee

9. Cooling Rack
Baked goods need to be cooled on a cooling rack that keeps it elevated, so it can cool uniformly on all sides and moisture doesn’t collect underneath.  Its also the best way to cook bacon: with a cooling rack on top of a cookie sheet baked in the oven.  Be sure to get “oven safe” chrome.

8. Pizza Cutter
Try making a pizza at home and then cutting slices with a knife — blerg!  Aside from the obvious pizza: pancakes, waffles, french toast, brownies, corn bread, hot dogs, sausages, to name a few.  It is also great for de-crusting bread, cutting it into cubes for croutons, etc.  With kids (until they are old enough to use a knife) this tool is vital.  Any sharp pizza cutter wheel will do the job.

Related: 25 Best Household Hacks

7. Food Scale
If you bake, then you should be weighing your ingredients (no two “cups” will ever weigh the same).  If you’re dieting, then you should be weighing your food.  The only accurate way to measure food is to weigh it.  There are cheaper ones out there, but a reliable Salter food scale for $20 is quite reasonable.

6. Stand Mixer (Kitchenaid)
Whether mixing recipe ingredients or kneading dough, stand mixers are pretty darn handy and will last you a lifetime.  Kitchenaid has attachments to juice citrus, slice/shred vegetables, make pasta, grind meat or grains, or make ice cream.  While there are other stand mixers on the market, a Kitchenaid stand mixer is the the gold standard.

5. Electric Kettle
Why use an electric kettle over a stove-top kettle?  Boils faster, doesn’t take up vital stove space, creates less heat, uses less energy, turns itself off if you forget about it, and makes the easiest hard boiled eggs ever.  This Breville electric kettle model has been heating my water flawlessly for years.

4. Crock Pot (slow cooker)
If you’re a busy woman (who isn’t?) and want to “fix it and forget it”, a Crock Pot is simply vital.  Uses very little energy, safe to leave the house with it on, almost any savory dish that you prepare in your oven can be adapted for a Crock Pot.  If you’re in the market for one, I strongly urge you to consider a Crock Pot with a countdown timer, which is what I use.

Related: Slowcooker Steel-Cut Oatmeal Custard

3. Cast Iron Skillet (frying pan)
Even though pots and pans are ubiquitous in a kitchen, most people either don’t have, don’t use, or don’t know that they need a cast iron skillet.  As women we need more iron in our diet than men do, and most women are low in iron without knowing it (yes, you should be getting your iron checked regularly).  Simply by cooking with a cast iron pan your food will acquire trace amounts of iron on a regular basis making supplementation unnecessary.  When properly seasoned and cared for, it will last not only your lifetime but your great-grand children’s lifetime.  Once accustomed to using one, it will become your most used cooking vessel.  Pancakes, eggs, sauted vegis, you can even bake dishes in it (such as baked beans).  They come in many shapes and sizes, but I consider the standard 12″ cast iron skillet to be essential. Note: even though they usually come pre-seasoned, I would urge you to properly season any new cast iron skillet at home at least 6 times, and never put it in the dishwasher.

2. Digital probe thermometer
There is simply no other way to bake, roast, or BBQ meat than to use a leave-in probe thermometer.  You jam the probe into the thickest part of the meat, there’s a thin heat-proof wire that snakes out of the oven door and plugs into the base.  You set the temperature that your meat requires (use a meat doneness chart) and it will alert you when its ready.  It takes all the worry and wondering out of cooking meat.  If you haven’t been roasting your Thanksgiving turkey with one of these, then you are simply working way too hard.  I’ve had the same Polder probe thermometer for 8  years and it still works great.

1. Infrared non-contact temperature gun
You might not believe me at first, but this easily the most useful kitchen item that I own.  It shoots an infrared laser beam at any surface and instantly tells you the temperature of the surface.  If your pan is too hot, the oil with burn/smoke, and burnt oil is carcinogenic as well as gross tasting.  You need to know the smoke point of your oil and you simply cannot cook without knowing how hot your vessel is.  Good cooks have learned through other means (experience) how to know if their pan is hot enough, whether using the back of their hand to feel the heat, or to toss some water drops, but all these methods are unnecessary with an infrared temperature gun.  You can also use it around your home to detect leaks or gaps in doors and windows, check if your central heating/air is operating at the correct efficiency, look for hot/cold spots in your home’s insulation.  There are some real cheap ones on the market now, but I’ve had the same Raytek infrared thermometer gun next to my stove for 12 years and it still works flawlessly.

Do you think we left something off the list?  Have opinions about any of these?  Please leave a comment below.

Reference: Smoke Points of Fats and Oils

Vegetable Shortening (Hydrogenated) 325°F
Butter 350°F
Coconut oil 350°F
Lard 375°F
Olive Oil 325°F – 375°F
Corn Oil 400°F – 450°F
Grapeseed Oil 420°F – 428°F
Canola Oil 425°F – 475°F
Clarified Butter 450°F – 475°F
Sunflower Oil 450°F – 475°F
Soybean Oil 450°F – 475°F
Safflower Oil 475°F – 500°F

Disclaimer: this article may contain affiliate links.

Baking With Terra Cotta Ceramic Pottery

Published Thursday, September 17th, 2015

Baking With Terra Cotta Ceramic Pottery

Terra cotta (terracotta, terra-cotta) is the Italian word for “baked earth” and humans have been cooking with it since before recorded history.  Its that inexpensive earthenware red clay pottery sold at nurseries and garden centers.  Terra cotta is ideal for baking because it absorbs and distributes heat much more evenly which will make your baked goods turn out better.  Pizza ovens (“brick ovens”)  are lined with ceramics for this same reason.  Before modern metal cookie sheets and loaf pans became fashionable in the 20th century, humans baked on ceramics.

Ovens Are Bad at Keeping Temperature
The heat in your oven turns on and off many times while baking, resulting in wildly uncontrollable temperate swings.  Even the most accurate oven will swing a minimum 40 degrees F from what you have it set to.  If set to 350, your food is actually baking at between 330 – 370 degrees F, and most ovens are even worse.  Having someone calibrate your oven’s thermostat or buying an oven thermometer are useless tips.  Baking with terra cotta helps to even out those temperature variations; when the heat is off the ceramic is still releasing steady heat, when the heat is on the ceramic is absorbing that excess heat.  Every oven also has hot and cold spots, which terra cotta will lessen the impact of.  Your baked goods prefer a more steady, constant heat.

Pizza Stones
Terra cotta tiles (also called quarry tiles) can also be purchased from a tile shop or home improvement store.  Four dollars worth of unglazed 1/2″ terra cotta tiles laid out on the bottom rack of your oven will do the same job as a $47 pizza stone.

Measure your oven rack before going to the tile store.  The tiles are available in
differing sizes from 6X6″ up to 16X16″.  The thicker the better, but always get baking with terra cotta pottery quarry stone tilesunglazed terra cotta.  Put one of the oven racks at the very bottom position, then lay your tiles on it, side-by-side (after seasoning them, details below).  If you feel inclined, you can lean some tiles up against the sidewall of your oven vertically, and put another layer on the rack above, making a sort of “brick-lined oven” around your baked goods.

Cooking pizza on terra cotta will give you a fantastic crust like you’ve never had  before at home.  You will need to preheat the oven to its highest temperature (450-500 degrees) for 45 min to an hour — with the tiles/stones in place — before putting the pizza directly onto the tiles.  Bake your pizza for 5-7 minutes.  A pizza paddle is helpful for quickly getting the pizza onto and off of the stones.

Feel free to leave the tiles in your oven forever; no need to remove them (except to wash them off occasionally — see cleaning below).

Saucer Instead of a Cookie Sheet
Use just the saucer (bottom piece, water catcher) of an unglazed, unpainted, terra cotta pot from a nursery or home improvement store.  Get one that’s at least 11″ diameter or larger, with a flat smooth inside surface (some may have ridges on the inside which is not workable).  Most saucers are the same depth as a conventional pie plate.  Works great for baking pie, or use instead of a cookie sheet for baking breads, cookies, scones, and biscuits.

Pots Instead of a Loaf or Cake Pan
Use small unglazed, unpainted, terra cotta pots in place of a loaf  or cake pan for baking bread, cakes, or brownies.  Cut a circle of parchment to cover the hole on the inside bottom.  Obviously if you need a flat cake then stick with a conventional cake pan, but 6oz-8oz ceramic pots makes for great individual-sized desert cakes or brownies.  Eat it right out of the pot.  Any standard bread or cake recipe will work, or boxed cake mix.  As usual insert a toothpick to know when the cake is done.

Prepare the Terra Cotta Ceramic Before Use
Unglazed ceramic is porous, so you’ll want to season it (create a non-stick barrier) much like you do with a cast iron skillet, in fact the process is nearly identical.

  1. Use a scrub pad on the ceramic to remove any small burs.
  2. Submerge in water and soak the ceramic overnight.
  3. Wash the pottery thoroughly with water (no soap), or run it through your dishwasher (again, no soap).  Soap will soak into the ceramic leaving a bad flavor.
  4. Place in a 200 degree F oven for 10 minutes, or until its bone dry.  Cool.
  5. Using a food-grade oil/grease (vegetable oil, Crisco, lard) pour some onto a clean cotton cloth or paper towel, then rub it all over your pottery, coating thoroughly. This process will change the color of your ceramic, so if you prefer to only apply oil to the top/inside (where the food will be) then that’s fine too, but for uniformity I suggest to oil the whole thing on all sides.
  6. Using a clean cloth or paper towel, wipe it all off until it looks dry.  The oil will have penetrated the pores, but you don’t want drips or excess on the surface.  You may be tempted to leave a thicker coat of oil on it — this will not speed up the process, but will leave drip marks and a non-uniform coating.
  7. Place the pottery upside down in a cool oven (let it preheat with the oven), and bake at 450 degrees F for one hour.  There should not be any drips if you wiped it down properly.  After the hour, turn off the oven (do not open the door to check on it) and let it cool for two hours.  Remove.  The ceramic will be darker.   Note: there will be smoke from the oil burning, which is WHAT YOU WANT.  (I am not telling you to take down your kitchen smoke alarm during this process, but I did.)  Its the burning of the oil that creates the hard glazed non-stick coating.  Over time the seasoned coating will continue to darken, especially on the top side where the baked items sit.  This is good; you want that glaze.  Even though its dark, this is not “dirt” and doesn’t need to be scrubbed off.
  8. While its not absolutely necessary, the more you season it, the better the results will be, so if you have the time and the ambition then you can do steps 3-5 as much as five more times.  There is no harm in using your terra cotta after only one seasoning.
  9. Always lightly oil/grease the terra cotta before baking with it (just the top part that will be touching the food).

Cleaning Your Terra Cotta Ceramics
To clean the ceramic simply wipe it down with a damp rag or sponge and rinse.  If very dirty, soak in clean water (no soap), then wipe clean.  If you only use it for baking breads and such then it shouldn’t get dirty enough to need any more than a gentle rinse.   Avoid excessive scrubbing or soap, and do not run through the dishwasher as this will remove the seasoned coating and the soaps/detergents can absorb into the porous clay which may alter the taste of the food.

A Note About Lead
Some rumors and uninformed people say that unglazed terra cotta contains lead and should never be used for baking.  This is false.  Terra cotta is safe for cooking food (even Martha Stewart bakes with terra cotta).  Pottery manufacturers do not add lead to their clay.  Glazed pottery may have lead in the glazing compound paint, which is why we urge you to only use unglazed, and season it properly (above).  However, since terra cotta is made from earthen clay, and the earth has trace amounts of lead naturally, it is possible for terra cotta to have a minute trace amount of lead in it (just as the dirt in your backyard might).  If you are very concerned, you can purchase a lead testing kit from a home improvement store to set your mind at ease, available in the paint section.  Additionally, even if there are trace amounts of lead, it won’t leech into your food unless the food is highly acidic, such as citrus.  Lead won’t float around in the air or leap onto your food when heated.  For baking, its a non-issue.  Lastly, you can always lay some parchment paper under your baked goods if you’re still concerned.

Terra cotta ceramic pottery are probably the least expensive item in your kitchen, but will perform better than the most expensive cookware, and will last you many years if properly cared for.  Almost any baked item will turn out better on terra cotta, and look damn sexy doing it!

Disclaimer: this article may contain affiliate links.

Funniest Mommy Memes

Published Tuesday, September 15th, 2015

A collection of my original funniest mommy memes parodying and/or exemplifying the reality of motherhood.  Feel free to share with your friends, but please give credit to the source.  Share buttons are on the left.  Enjoy!

Most of Adulthood meme mommyperfect

Halloween expectation vs reality

Ya I know what "Netflix and chill" means but right now I'm gonna sit down and watch Netflix.

You said Netflix and chill so I made popcorn.

Pinterest moms are making homemade soap and paleo cookies and I'm all like, "I took a shower and kept the kids alive."

Why do you want me to take a shower before we watch Netflix? Oh your said "Netflix and chill".

Once you have kids "Netflix and chill" means sit down and watch a movie.

If "Netflix and chill" means sex what am I supposed to say when I want to watch Netflix?


Tooth Fairy Didn’t Come

Published Tuesday, September 15th, 2015
Tooth Fairy Didn't Come
(Image source: Norman Rockwell)

When I was a little kid (which doesn’t seem like that long ago, but I keep being told that in fact it was) I had the notion that the Tooth Fairy would inspect the tooth you left her and that your reward was commensurate with the quality of the incisor.  One Saturday morning when I was about 6 a tooth came out, so I set about polishing it for the fairy lady.  I brushed it and rinsed it, but it didn’t strike me as quite pearly enough.  So I pulled the stopper on the bathroom sink, filled the basin with warm water, squirted some toothpaste into it, and dropped my tooth in to soak.  I had seem my mother do this with sweaters, so I figured it was a viable way to clean things.  Off I galloped to play — it was Saturday after all, and that’s what kids did in those days.

A few hours later I came back inside to see how white the tooth was now, but to my horror the sink was empty; no tooth, no water.  I ran crying to my mom, who was previously unaware of my tooth-bath, where I explained to her my whole scheme.  She confessed to have assumed it was just a sink of soapy water and drained it, tooth and all.  She tried her best to console me, but explained that the water from the sink goes under the road into a nasty place called “the sewer” which is the same place that the toilet water goes.  “Your tooth is gone, and we can’t get it back.”

Not to be deterred, while asking my mother how to spell the words, I wrote a letter to the tooth fairy, knowing full well that she has magic and can simply teleport the mucky thing back from the nether regions of the municipal water systems.  The letter asked that the tooth fairy go find it and leave it for me so that I could know that she was all-powerful as I suspected.

Sunday morning I woke up to find that the letter was still under my pillow where I had left it, along with the missing tooth, and a $1 bill, which was the going rate back then.  My faith in the tooth fairy’s omnipotence was never stronger.  For the next few years she held rank above even Santa Claus, because he wouldn’t have been able to dig my lost tooth out of the sewers — that took fairy power!

When I was older and wiser I asked my parents about this incident.  Had my mom taken the tooth out before draining the sink, and if so, why make me suffer the loss all day?  It turns out that after it was discovered that my tooth was missing down the drain, my father (without my seeing him) had pulled off the trap from under the bathroom sink and it was sitting right in there.  Clever guy.  Ever since then I have appreciated that effort.  While they could have simple blown the whole charade, the wonderment that event created in my young self was profound and delightful.

When our first born lost her first tooth, I naturally had a fondness for the tooth fairy myth and was entirely comfortable perpetuating it for my offspring.  We followed the normal routine, but I didn’t give even a glancing thought about what the going rate was for fallen teeth.  That night the tooth fairy left a $1 bill under her pillow like she always had done with my generation.

That next day at school Hayley was naturally keen to tell her classmates about her newly acquired loot.  To her dismay as well as my own, she discovered from her toothless peers that the tooth fairy had been affected by inflation like everything else and was giving the other kids $5 per tooth, not the mere $1 that Hayley had received.  Mental note: $5 next time.  “Maybe you need to brush better,” I told her, which seemed plausible enough to her and she shrugged it off.  Every other tooth after that got paid $5.

That was a few years ago.  For those who are unfamiliar or have forgotten, kids lose the front eight incisors first, around the age of 6-7, then they take a break for a few years.  Around age 11-12 the molars begin popping out.  Hayley just recently entered phase two of tooth-loss, so age-wise she’s getting near the edge of disbelief.  I’m not entirely certain at this time about the strength of her belief in the Big Three (Santa, Easter Bunny, tooth fairy), but her younger brother Luke is definitely in the prime of his childhood fantasy years so we’ve made every effort to keep the show going.  Obviously at some point the logical mind’s maturity intersects with the childhood myths, and they reason their way out of those beliefs all by themselves.  

So when Hayley lost her first molar last month — which was the first tooth to come out in a few years — she did the usual routine and went to sleep.  I told Mr. Perfect (my husband) to remember the tooth fairy, he told me to remember it too, we watched some TV and that was that.  In the morning Hayley came walking forlorn into the kitchen as Mr. Perfect and I were preparing breakfast.  “The tooth fairy didn’t come,” she moped.

DREAD!  We both forgot!  I instantly gave my husband a brief sideways glance with eyebrows arched that clearly meant “You stall — I’ll get the money.”  Without missing a beat he picked up exactly what I was putting down and calmly took Hayley off to her room.  He began explaining to her something about tossing and turning when she sleeps, while I dashed to my purse.  As she showed him where the tooth had been placed under her pillow, I silently slipped a $5 bill into his waiting outstretched palm behind his back.  Like a card magician he palmed the bill invisibly in one hand, grabbed the corner of the bed where it meets the wall, and as he heaved it away from the wall in that sudden aggressive way that men move furniture, he released the bill into the void.  Hailey peered around him to see and there lay the elusive loot on the floor.  “See dear, it had fallen into the crack.”  She was delighted.  If she suspected any shenanigans, it wasn’t apparent to either of us.

It’s certainly not as fantastical as my lost tooth adventure from my youth, but its a small gesture that I hope she will appreciate some day and perhaps encourage her to pass along that bit of childhood wonderment to her cubs.


Misadventures of a Couch-to-5K

Published Tuesday, September 8th, 2015

Misadventures of a Couch to 5K

I woke up last Monday and decided I would get in better shape; more hourglass, less apple.  Just looking to shed that extra 20 lbs that the second baby left behind for me.  I hadn’t even had my coffee yet, so it may have been a sleep-induced hysteria, or maybe a mild stroke?  The way I figured to manage this was to walk (maybe jog?) a 5k race.  Obviously the first step on the journey to fitness was to find a race and register for it.  I managed that pretty easily by using the internet and charging $20 to my credit card.  Now I have to be able to actually do the thing.  

Step two, I found an app for my phone to help me get there.  It has a virtual coach that tells you when to warm up, speed up/slow down, and then cool down, tracks mileage and pace, etc.  Its called “Couch to 5K” by Active.  I’m sure other apps do a similar things as well, but this isn’t meant to be an app review.  I have a great plan to do the workouts on Mon, Wed, and Fri with some leg strengthening exercises in between, and the weekend off.  Doesn’t sound too bad; I used to hit the gym pretty hard back in the day (before pregnancy) so this should be easy.  Having made this plan, I decided that I should take a week off — I’ll start next Monday!

Next Monday rolls around and I am ready to start.  I too am a bit surprised that I was still willing to do this.  Got my shoes on and music playing, I get the app started and I’m outside warming up.  I had the thought that I’d better walk away from the house, because if I go around the block I might just stop and go inside.  As I’m walking through the warm up the app “coach” speaks to me over the music, “Jog for 30 seconds!”

Wait, what?!  Already!  I’m still warming up.  Okay fine I’ll try it.  I force my legs to engage but there’s not a lot of gusto.  A few seconds into the jog interval and think to myself, “I’ll try harder on the next interval.”  It goes like this the whole work out.  I realize that I am not ready for the jogging portion of the workouts; better to just stick to the walking for now.  

Tuesday I do the leg strengthening exercises with a tension band, no big deal.  Wednesday (day 2 of the program) and the jogging intervals are even longer than the first day.  I’m thinking this app says “Couch to 5K”, but I barely made it through day one and everything hurts — I think I need a “Couch to Walking 5K” app.

Next day is another strength day.  I glare at the evil bands and swear that I hear a supernatural laugh coming from them.  Possessed little rubber shits!  I’ll get to it later, because I don’t need that kind of negativity right now.  As you can guess later never comes, and neither does the Friday jog (walk) workout.  My legs are on strike; all the muscles are tight.  Instead I do stretching, but they are stubborn.  I wonder if the demonic laughter was coming from my sore thighs. 

Weekends are rest days, and my discipline to the program is very strong when it comes to rest days.  What’s this?  Its Labor Day weekend?  3-day-weekend… YES!  Monday is family time, bitches.  

Tuesday I realize that I ought to get back at it.  I’ve given my body five days of rest (after the initial three days of work), so I should be good by now.  It can’t be as bad as last week.  I strap on, zip up, get out there, fire up the app and get warming up.  Along comes the “coach” shouting at me to do the first interval: a one minute jog.  Woah, woah, woah… horsie!  I’m still trying to get to the original 30 seconds from day 1.

I stop and stare at the app in disbelief that it thinks I need to jump up the time that soon.  I give it some choice words, when I consider if all the recent demonic possessions may have originated with this app!  I decide to suck it up and try this one minute interval — just once, and see how it goes.  

I get into stride, counting down the seconds of this experimental interval, lungs heaving, thighs burning, when the skies very suddenly open up with a torrential shower.  I half-heartedly laugh at how this is the sort of thing that happens in bad movies, but I keep pressing.  Then a moment later there’s a heart-stopping crackle as lightning strikes overhead.  The weather app on my phone buzzes to let me know that lightning is striking near me (thanks wet phone!).  The jogging interval becomes me running home quickly.  Apparently the threat of death is very motivating.

So you see, the universe believes I am better off doing something else.  I know I have this race coming up, but maybe I would be better off with something less competitive, like yoga; but just the shavasana part where you lay down in the “sleeping pose”.  I could win at that.

Gidget Fraser is a guest writer for Mommy Perfect.

Autumn: It’s Yankee Candle Time!

Published Tuesday, September 8th, 2015

Autumn: It's Yankee Candle Time!

Every leaf speaks bliss to me,
fluttering from the autumn tree.” –Emily Bronte

Labor Day has passed, the kids are back in school, and autumn’s cool breath brings its smells of fallen leaves and late harvest.  My instincts call me to make the home “cozy” again; comforting, warm, and inviting.  The smells of baked apples with cinnamon, browning butter, baked squashes and roasted fowl.  These aromas lend as much to the season as the changing leaves and weather do, and since my days are not spent exclusively in the kitchen, I lean heavily on Yankee Candle.

To me it simply doesn’t seem appropriate to light a candle in the spring and summer; nature’s fragrances waft in on their own when the windows are open, but once the chill of fall begins to set in I pack the kids into the car and head down to the local Yankee Candle store.  My kids love to walk the store smelling the delicious flavors and collecting the small wax melts (“tarts”) that they want to bring home, their little noses soon too overwhelmed and saturated to tell the scents apart.  A trick I’ve learned is to smell the inside lid of the candle jars rather than the candle wax itself, as the lid only retains a subtle waft which won’t smother your nose.  They provide jars of whole coffee beans to cleanse your sniffer between samples, but the kids don’t care so much.  Much of the fun is in seeing if the names and photos on the fragrances match what your minds eye thinks the title ought to smell like.

Autumn in the Park (picture of a park bench under a row of golden leafed trees); the scent of fresh peeled apple and the crispness of fallen leaves to capture an afternoon on a gorgeous autumn walk.

Harvest (picture of decorative dried corn); cinnamon, cloves, ripe autumn apples, and a hint of pumpkin to make the home cozy and inviting.

Apple Pumpkin (picture of assorted apples and pumpkins); slightly sweet, earthy notes of pumpkin and clove, with a little bit of spiced apple, bring the season home to welcome family and friends.

Just a few examples.  Its fun to smell them all and be transported in your mind to another time — of joy, bounty, hearth and home.  Not all the scents hit the mark for me, some annoy me or just bother my nose, but most of their fall and winter selections are delightful.

Aside from the great scenteYankee Candle tarts
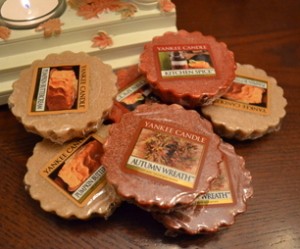
d jars, Yankee Candle also makes wax melts (“tarts”)  in all the same scents.  Their themed seasonal wax warmers are often gorgeous works of kitschy art, with a dish hanging from a chain that holds the wax when a lit tealight is placed underneath it.  Every year they have a new themed collection for fall, Halloween, Thanksgiving, and Christmas.  In my home we burn the wax warmers almost exclusively, rather than the candle jars, mostly because the delightful decorative wax warmers are just so pretty.  I already have quite a few at home, but the new annual offerings often spurs me to add to my collection.  The good ones often sell out quickly, but will sometimes end up on eBay if the stores are out of stock.

The kids dump their hautumn barn warmer
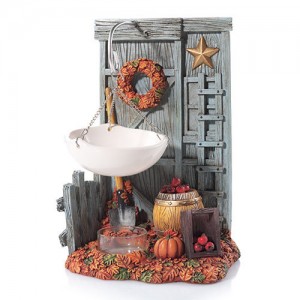
andfuls of wax melts into the basket, I add a few of this years’ new fragrances that I want to try.  You can’t fully know how the scents fill out your home until its burning on your mantle.  I pine to buy the new “Fall Barn” hanging wax warmer, but I pledge to wait and bring my husband back to get his opinion.  And when winter comes we’ll do this all again.


Gidget Fraser is a guest writer for Mommy Perfect.

How to Make the Perfect Cup of Coffee

Published Sunday, September 6th, 2015

How to Make the Perfect Cup of Coffee

“My name is Gidget Fraser and I’m a coffee addict…”
…is what I would say if people like me needed support groups.  Fortunately we don’t because coffee is wonderful and there’s almost no downside to it.  In some “extreme health” circles coffee has been vilified because it does contain trace amounts of certain natural chemicals, but honestly all reputable scientific studies have consistently revealed that coffee isn’t just great, its better than we thought.  Coffee really is a health food.  In addition to being a coffee addict, I’m also an admitted coffee geek.  For those of you who may not be familiar with the subculture of craft coffee, the rabbit hole goes deep, is full of nerds worse than LARPers, and at least as technical as beer geeks.  I spent many years studying the art of brewing coffee.  I’ve traveled to 14 different countries pursuing great coffee and espresso from each.  I’ve been down the rabbit hole and back.

This article isn’t for the geeks like me who have a professional-grade espresso machine in their kitchen, but for the average person who wants to enjoy a darn good cup of coffee without too much fuss.  I’ve waded through the mire of methods, machines, gadgets, and gizmos.  Rather than bore you with a “Top 10 List” of brewing system, or explain all the methods that you shouldn’t try, I’ll skip right to the end.  This is what you need to make the perfect cup of coffee:

The Basics: Beans, grinder, extraction device
The simplicity of brewing coffee is to extract the chemicals from the beans using a solution (water).  Everybody focuses too heavily on the extraction method/device, (which is the least important part) while dismissing the absolutely vital elements: the grinder and beans.

Extraction Device: Bodum French press potbodum
The best method for home brewing
coffee is the french press pot, the most common brand of which is the Bodum.  If you don’t have one, they come in various sizes: 3 cup, 8 cup, 12 cup.  The Bodum is capable of extracting a truly exquisite cup, provided that the two other elements are also quality (beans and grinder).  Note: You cannot make espresso in a french press, no matter what anybody tells you.  It can make a strong 1oz cup of coffee, but its simply a different animal than espresso.

Beans: Freshly roasted whole beans (not pre-ground)
Pre-ground coffee is stale.  Freshly fresh beansroasted is obviously going to taste so much better.  Ideally 7-14 days since it was roasted.  If you can’t buy locally roasted fresh beans, at least buy whole bean.  If you can only get pre-ground, then drink tea.  You can order
an infinite variety of specialty/craft beans online, which is entirely your personal preference.  I can’t tell you what beans you’ll prefer anymore than I can tell you what wine you like.   Test different beans to discover what flavors you enjoy.

Burr Grinder
While it may sound overly geeky, the grinder
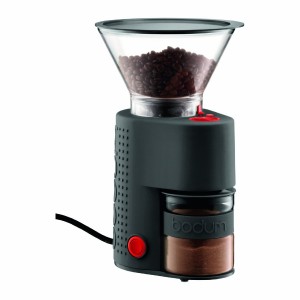
grind is truly the most important step in making a great cup of coffee (other than the water).  More important than the beans?  Yes!  Excellent beans with a cheap grinder will taste bad, while cheap beans with an excellent grinder can still taste okay.  The common blade grinder is inconsistent (some parts of the grind is too fine while some is too course).  A quality burr grinder will grind all your beans the same consistency because you can adjust the grinder to precise particle size, which yields a far better cup.  Burr grinders aren’t cheap however (roughly $100) when compared to a blade grinder (roughly $20).  I fully recognize that not everybody can afford a $100 grinder, so if all you have is a blade grinder, that’s fine, but if you’re not happy with the results just be aware that your grinder is to blame.  You can still make a darn good cup of coffee using a blade grinder and the steps below, but if you want to make the perfect cup of coffee you’ll need to invest in a burr grinder.  Note: If you can’t afford an electric burr grinder right now, there are manual burr grinders available for around $20, with the added bonus of getting to feel like you’re a pioneer!

Water
Obviously water quality matters.  If your water tastes bad, so will your coffee (since coffee is 99.9% water).  However you don’t want ultra pure water either.  Distilled, reverse-osmosis, or other heavily filtered water does NOT make good coffee because it lacks minerals.  The tiny minerals in the water actually grab hold of the coffee oils and chemicals which provides the great taste.  If the water lacks minerals then the water is literally too slippery and will slide right past the coffee bits that you want.  Use spring water, tap water, or some combination.

 Make the Perfect Cup of Coffee

  1. Pre boil your water.  You’ll want 6oz of water per “cup of coffee”.
  2. Grind your beans.  Course, like rough sand.  It may take a bit of time to get the grind adjusted to exactly where you want it.  Uniform large particles is desired for a Bodum french press.  If you have a combination of dust and boulders, see the Grinder section above.
  3. Add grounds to the Bodum.  Two rounded tablespoons per “cup of coffee”*.
  4. Add water to the Bodum.  6oz of water per “cup of coffee”*.
  5. Optional step: stir the saturated grounds with a wooden spoon or chopsticks a few times.
  6. Put the lid on the Bodum, but don’t push down on the plunger.
  7. Set timer for 4 minutes*.
  8. After steeping 4 minutes, plunge the filter slowly.  Grasp the plunger stick, keeping it absolutely straight up, press down evenly and controlled (if it goes crooked, grounds will escape into the upper part).  It will be stiff, but don’t push too hard.  I just let the weight of my hand/arm push it down.
  9. Turn the lid so that the grill is aligned with the spout.  Hold the lid while pouring slow and steady.

Enjoy!

*Two rounded tablespoons per 6 oz boiling water steeped for 4 minutes.  This ratio is how I like my coffee, and is commonly accepted brewing practice for a Bodum.  Feel free to experiment with the ratios slightly, just keep notes of what you changed so you can remember what to do, or not do, next time.  For example: 6 oz water steeped for 3 minutes; 8 oz water steeped for 4 minutes.  Find the taste that you prefer.

Disclaimer: this article may contain affiliate links.


Adult Party Games

Published Friday, September 4th, 2015
Adult Party Games
(Image source: vintage ad)

Adult Party Games (G-Rated)

Many obscure vintage games are experiencing a revival in adult social circles, parties, BBQs, or Meetup events.  Until recently I was only familiar with a few of these.  I was invited to a party where the more obscure games were being played and felt a bit awkward that I was unfamiliar.

Nobody likes to show up to play some game when I have no idea what it involves. If you get invited to play bocce ball with some friends you don’t want to show up in heels, or go to a cribbage game in athletic gear thinking its an active game.  Just so you can be a bit more familiar with what games are coming back in, I’ve compiled a list of a few fun adult party games.

What is Bunco?
As it is played today, bunco is a social dice game involving 100% luck (no skill, no decisions to be made).  Members of a Bunco club take turns hosting, providing snacks, refreshments and the tables to set up the games.  The host/hostess may also provide a door prize.  Small amounts of money can be involved as well.  The object of the game is to accumulate points by rolling certain combinations.  The winners get prizes for accomplishments such as the highest score, the lowest score, or the most buncos (provided by the host/hostess or pooled from the club resources).  Prizes frequently center on themes associated with the game such as fancy dice, dice embedded in soap, T-shirts featuring illustrations of dice, etc.  Bunco rules are simple.

What is Canasta?
It is a card game resembling rummy, using two packs.  It is usually played by two pairs of partners, and the aim is to collect sets (or melds) of cards.  Its a great social game because you play as a teams.  Canasta is very easy to grasp, even for new players.  Canasta rules.

What is Bocce ball?(pronounced boch-ee)
It is a game that is an Italian variety of lawn bowling played outdoors on a dirt court that is shorter and narrower than the rink of a bowling green.  The players toss or roll heavy balls (called a bocce) across an area of ground and try to get each ball to stop as near as possible to a smaller ball (called a pallino or jack). There are two teams with one to four players on each. They first toss the pallino, then take turns rolling the bocce at the pallino.  It is scored when all four balls have been used on each team.  The one team that has the most bocce closest to the palino get points.  Detailed bocce rules.

What is Cribbage?
Cribbage is an old game that goes back hundreds of years and is really gaining in popularity again recently.  It is a card game for two to four players in which a special peg board is used to count each player’s points.  The objective is to play so that the value of one’s cards played reaches exactly 15 or 31.  The goal is to be the first player to reach either 61 or 121 points, whichever is agreed upon in the beginning.  The official rules are lengthy, but beginner cribbage rules will get you started.

What is Croquet?
Croquet is another game that’s at least 300 years old which is becoming popular with a new generation.  Not to be confused with cricket, croquet is a sport that involves hitting plastic or wooden balls with a mallet through small arches, called wickets, stuck in a grass playing area.  It involves hitting your own colored ball through a circuit marked with two stakes and nine metal wickets. After striking the ball through the first set of wickets, then hitting the far stake, players do the return circuit back to the start, where they must also hit that stake.  Players hit one ball per turn. But hitting the ball of another player, earns you two extra strokes.  First player back to the starting stake wins.  Croquet can involve a lot of technique and strategy, but the basic croquet rules will get you familiar.

Now you don’t have to feel awkward if you find yourself at an adult gathering where these are being played.  Know of any other games making a revival?  Let us know in the comments below.

How to Host a Kids Halloween Party

Published Wednesday, September 2nd, 2015
how to host a kids halloween party
(Image source: vintage ad)

Well here we are cruising through this year so fast that its already time to think about Halloween again.   When I was 9 years old my mom hosted a very simple Halloween party for me and a few of my neighborhood friends.  Looking back now, it was very basic, but I remember it so fondly.  My friends were all super impressed, I guess because their parents never did anything like that for them.  Last year I decided to host one for my kids.  The initial idea sounded great, but if you’re like me, actually hosting one sounds like a nightmare.  I immediately began thinking of all the elaborate magazine and Pinterest party ideas that look so marvelous — the anxiety set in and then I needed a drink and a sit-down.  I worried I wouldn’t have the time/money/creativity to keep up with all of that.  I was already talking myself out of the idea, when I realized that if I can keep it simple like my mom did, the kids will love it just as much.   No need to channel Martha Stewart.  I don’t need to impress the parents — its for the kids!  With that motto firmly printed in my brain I set out to make a fun, but simple and inexpensive, kids Halloween party.  Ages 5-12.

1. Keep It Simple
Its for the kids, not the parents.  Although the parents will enjoy it as well, keep the focus on the kids.  The kids won’t remember it nor care if you spent 5 hours making a pumpkin soup from scratch that you serve in little bread bowls, so keep it simple.

2. Decide Your Budget
Do this in advance of any other planning.  Budget what you can afford and stick to that.  Limiting your budget doesn’t have to mean a limit to the fun, but surprising your husband with an over-limit credit card isn’t going to help the household stress heading into the Christmas season.

3.  Limit The Guests
Decide upfront on a limit of friends each child can invite.  Consider the friends’ siblings and parents who will likely attend, figure out how many people your house can comfortably hold, work it all in with your budget from #2 (above).  For example: if you have 3 kids of your own, they each invite 2 friends, that’s already 9 kids; plus their mothers is 15.  If fathers or siblings come as well, you’re over 20 people!  Not everybody has room for that many people in their home.  There’s nothing wrong with giving your children a limit on how many friends they can invite.  We live in the real world, in real homes, and there’s no shame in setting limits.

4. Pick a Date
Pick a few dates that work for you, then start shopping it to their friends.  I suggest a Friday evening (after school) or Saturday afternoon.  Doing it on Halloween night doesn’t strike me as especially workable for most people, but to each his own.

5. Costumes or not?
Its not an automatic that a Halloween party be a costume party.  Depends on what activities you plan, but most parents don’t want to ruin their costumes before Halloween.  Personally, I tell the kids no costumes.

6. Buy Simple/Inexpensive Decorations
Let your budget dictate, but if you’ve ever been to craft store or a seasonal Halloween store then you know how elaborate (and costly) these can be.

  • Tablecloths: Orange, black, or Halloween specific tablecloths are inexpensive at a dollar store or a party store.  ~$2
  • Balloons: Orange, black, or yellow (autumn) balloons.  No helium needed, just blow them up and hang them around with some Scotch tape.  ~$2
  • Paper cut-out decorations.  Jack-o-lanterns, black cats, scarecrows, etc.  Use a push-pin to attach to the walls.  ~$1 and up (each).

7. Games

  • Pin the the Nose on the Pumpkin“.  You can buy online for a few bucks, or make your own with craft paper.  Not complicated.  Same rules as the classic “Pin the Tail on the Donkey”.  If you make your own, be sure to make a dotted outline of the nose on the pumpkin in advance so that everybody can see where they’re supposed to have gotten it.  ~$4
  • “Eat the Doughnut from a String”.  Hang a doughnut on a string about face height and try to eat it without using hands.  Can be a race or not.  Use a push-pin to hang the string above a doorway if you don’t have any better locations.  Cotton twine ~$5.  A dozen donuts ~$5 at your supermarket.
  • “Pumpkin Bowling”.  Decorate up to 10 plastic bottles (1 or 2 liter, empty, washed) with painted or glued on faces, set them up like bowling pins and knock them down by rolling a small pumpkin.  Even the roundest pumpkins won’t roll straight, which kids think is really funny as it wobbles all around.  ~$2 for a pumpkin (not counting the soda pop you drank).
  • “Ring Toss”.  When done bowling, re-purpose the bottles for a ring toss game. You can make rings by cutting out the center of paper plates.
  • “Bobbing For Apples”.  Its a classic, and the kids love it.  You need a very large bucket or half-barrel for this game.  Your average buckets simply won’t work.  Be warned: I learned through personal experience that some parents are very afraid of germs and don’t want their kids dunking their faces into a communal bucket.  Personally I think its fine.  Kids are exposed to more germs at school or a swimming pool, but you know how some parents can be.  If you decide to play this game, tell the parents in advance to bring an extra shirt to the party.  Its also best to play this game outside.  70-quart horse “muck bucket” for ~$20.  A bag of apples ~$4.

8.  Themed Snacks
Fun snacks can help create the atmosphere, just remember to keep it simple. Don’t go bonkers!  Some ideas are:

  • “Witches Potion” (or Goul-Aid);  Get a large soup pot and fill with a drink of your choice (Kool-Aid, juice, punch, etc).  Buy dry ice from the supermarket and using gloves carefully place chunks into the pot.  The spooky smoky vapor is always a hit at the party!  I suggest that you call around to find the dry ice before driving all around town — not every place sells it.  ~$15 for a pot; ~$1 for Kool-Aid; ~$10 for dry ice.
  • “Ghost-Shaped Sandwiches”; either buy a ghost cookie cutter, or just use a knife and do your best by hand.  Peanut butter and jelly, lunch meats, cucumbers and cream cheese, etc.  ~$5
  • “Worms and Dirt”;  Chocolate pudding topped with crushed Oreo cookies and gummy worms on top.  To crush the Oreos, separate the cookies and scrape off the creme filling.  Put just the cookie parts into a ziplock back and let your kids smash it with something solid (meat tenderizer, rolling pin, etc).  ~$5
  • “Witches Brooms”;  Mini peanut butter cups unwrapped and up-side-down with a pretzel stick in the center.  ~5.
  • Sangria (“blood”) for the parents;  A couple bottles of Yellow Tail Sangria, which you can buy at Walmart or a liquor store, add some fresh fruit (sliced oranges, sliced apples, grapes), put it in a beverage dispenser with a spooky label.  Sangria ~$10; fresh fruit ~$5; drink dispenser ~$20.

9.  Background Noise

  • Haunted House Sounds; Play some spooky sounds or music in the background.  There are CD’s you can buy or find something on the internet.  I like this old Disney Haunted House record.  Free.
  • Put on a classic Halloween special;  The kids never stop to watch it, but you can put on a TV show as background ambiance.  Its The Great Pumpkin Charlie Brown and The Adventures of Ichabod Crane (Disney animated movie) are a couple of great ones.

It’s not super fancy, but the kids are guaranteed to love it.  And for the rest of their lives they’ll remember the Halloween parties you gave them when they were kids.

Disclaimer: this article may contain affiliate links.

Poem: The Honest Working Man

Published Thursday, August 27th, 2015
The Honest Working Man
(Image source: Shorpy.com)

The Honest Working Man
By Marie Joussaye

As through the world we take our way
How oftentimes we hear
The praises sung of wealthy men,
Of prince, and duke and peer.
The poets tell us of their fame,
They are lauded o’er the land,
But you very seldom hear them sing
Of the honest working man.

They praise the wealthy banker,
The purse-proud millionaire;
Their pockets have golden lining,
So they’re praised from everywhere.
Let others sing the praises
Of those darlings of the land,
But mine shall be a nobler theme–
The honest working man.

Let monarchs prize their glittering crowns
And all their royal host,
Let lordlings brag of their blue blood–
They have nothing else to boast.
But what is all their rank, compared
To our hero, true and grand,
One of fair Nature’s noblemen–
The honest working man.

His hands may be both rough and hard,
His clothes and speech be plain,
But you will find his manly heart
Without a spot or stain.
And there are some whose clothes are fine.
Whose hands are soft and white,
But the secret records of their lives
Could never bear the light.

May Heaven’s choicest blessings fall
Upon that hero’s head,
Who bravely toils throughout each day
To earn his loved ones bread.
You’ll find no monarch who can show
A record half so grand.
God bless great labor’s true-born knight–
The honest working man.

So now of Fortune’s favored ones,
Henceforth let less be said,
And more be spoken of the man
Who toils for daily bread.
God bless each hardy son of toil
That labors in the land.
Let us give three cheers with right good will
For the honest working man.

Written By Marie Joussaye, excerpt from The Songs That Quinte Sang

Disclaimer: this article may contain affiliate links.

Easy Breakfast Options

Published Wednesday, August 26th, 2015
Easy Breakfast Options
(Image source: vintage ad)

If you have school-aged children then you know how difficult mornings can be, especially preparing breakfast.  It’s been proven that having breakfast sets the kids up for a better day in school, but sometimes I just don’t have it in me to make a big breakfast.  If your kids are anything like mine a bowl of cereal will last them 30 minutes before they are hungry again.

Here are some quick and easy breakfast options that I’ve developed to make the morning a little easier.

Slowcooker Steel-Cut Oatmeal Custard
The prep time on this is under a minute.  It cooks overnight in your crock pot, ready when you wake, hearty and high in protein.  Follow this link to my complete recipe for slowcooker steel-cut oatmeal custard.

Overnight Oats
Simply mix rolled oats with an equal amount of your liquid of choice.  You can use any combination of dairy or non-dairy milk, yogurt, or even juice; just stick with the same basic 1:1 ratio.  Mix any spices, sweeteners, or dried fruit you like into the oats and milk.  Store in a glass jar or another airtight container and let  the mixture soak for at least three hours, ideally overnight.  In the morning, you can add fresh fruit, nuts, and other favorite toppings to your oatmeal.  You can eat it cold or warm, as desired.

Frozen Waffles (or pancakes)
Make a batch of waffles or pancakes and keep them in the freezer for heating in the toaster, just like Eggos (but much tastier and less expensive).

First make the waffles or pancakes as usual (your favorite recipe).  Completely cool on wire racks and place them on parchment lined cookie sheet in the freezer until frozen (about 2 hours).  Transfer to freezer bags marked with the date. They can be kept up to 3 months if you do a good job squeezing the air out before placing in the freezer.  

Yogurt Parfaits
Use greek yogurt for added protein.  Add any fresh or dried fruit, nuts, or sweeteners like honey or maple syrup.  Store in the fridge in small tupperware containers with lids.  Grab a spoon and eat on the go.

Protein Smoothies
Don’t get spooked at the thought of it, but liquid egg whites* is a fantastic secret.  Its not slimy and goopy like raw egg whites are, and its been pasteurized to make it safe.  Its tasteless, pours like milk, can be mixed with any liquid without changing the texture, and nobody will be the wiser (just don’t let them see you do it).  Buy it at your local grocer, in the egg section.    

All you need is milk or juice, liquid egg whites , and any frozen or fresh fruit (or veggies) that you like.  Blend will, and don’t tell them that they just drank 3 eggs!

Here are some examples:

Chocolate Banana Milk Shake
1/2 frozen banana
1/2 cup milk
1/2 cup liquid egg whites
2 tablespoons Hershey’s Chocolate Sauce (or similar)
Blend well.

Very Berry Smoothie
1/2 frozen mixed frozen
1/2 cup milk
1/2 cup liquid egg whites
1 tablespoon honey (or other sweetener to taste)
Blend well.

Chocolate Milk
1/2 cup milk
1/2 cup liquid egg whites
2 tablespoons Hershey’s Chocolate Sauce (or similar)

This is the best trick ever:  You can make the chocolate milk in larger quantities too, just stick with the one part liquid egg whites to one part milk (1:1 ratio).  Add Hershey’s chocolate sauce (or similar) and shake well.  Make this in advance in an empty half-gallon plastic jug of store bought chocolate milk (Nesquik, etc) and your kids will never know they are drinking 3 eggs with every cup of chocolate milk.  (Shake well before serving.)

*Please note that raw eggs should not be used in this manner due to the risk of bacterial illness.

Half-cup of liquid egg whites is equal to about 3 eggs and provides 15 grams of protein.

I hope this helps all you non-morning mommies like me.

Related: How to Brew the Perfect Cup of Coffee

Update: I’ve come up a with a high protein buttermilk pancake recipe that I call Power Pancakes which I promise are worth trying.  Your kids and your husband won’t know that they’re healthy.  Check it out!

How to Get Kids to Brush Their Teeth

Published Tuesday, August 25th, 2015
How to Get Kids to Brush Their Teeth
(Image source: vintage ad)

Surely we all know that proper tooth care is vital, but it can be challenging with little ones.  I’ve witnessed enough pediatric tooth decay and subsequent dental work (sometimes traumatic) to know without a doubt that following these tips are worth the time and effort to learn how to get kids to brush their teeth.

1. Start Young
As soon as baby’s first tooth comes through, start brushing it regularly with a soft bristle baby toothbrush (the “baby” ones flare out to prevent choking).  Let the little tyke use it as a soother if he likes — get him used to it.  Baby tooth paste is available that is safe to be swallowed by the very young ones, but isn’t entirely necessary.  The important thing is to brush it often.  The most current recommendations for use of fluoride toothpaste is no more than a ‘smear’ or ‘rice-size’ amount of fluoridated toothpaste for children under three years old, and no more than a ‘pea-size’ amount of fluoridated toothpaste is appropriate for children aged three to six.  More on fluoride later.

2.  Set an Example
Children are very big on mimicry, so let them see you brushing.  Make it an activity that you do together: “See, we’re all brushing!”  Give the child their own toothbrush to mimic you with.  After they’ve had a turn to brush themselves, then its your turn to brush their teeth (to make sure it was done properly).

3.  Even If They Fuss, Just Do It
They might fuss — just do it anyways.  This is one of those things that needs to be done.  As a mom it can be hard to forcibly do something to your child that is making them cry — just do it anyways.  The alternative (tooth decay) is far worse than a few moments of crying.  You’re not hurting them, and the moment you stop brushing they stop crying, so clearly its not damaging them physically or emotionally.  Think of it like a dirty diaper in that you do it whether they cry or not because its vital.  Don’t learn this lesson the hard way (at the pediatric dentist office).

4.  Make It Routine
With children, routine is big — really big.  Do the same things every day at the same time, it doesn’t take long for them to get the gist.  This goes for anything.  After you eat, you brush.  Before bed, your brush.  Before school, you brush.  Make it routine.

5.  Two Minutes
Dentists all agree that 2 minutes of brushing is necessary to get the job done on a mouth full of teeth.  As soon as the child is old enough to tolerate 2 minutes of brushing, make that the standard.  I’m not suggesting that 2 minutes is necessary for baby’s first tooth at 4 months old, but work towards that.  Once all their teeth are in: 2 minutes per brushing session.

6. Use an Hourglass (or other timer)
You can get a 2 minute hourglass for under $1.  Most kids are surprisingly fascinated with hourglasses and once that’s part of the routine they will gladly use it.  There are also electronic alarm timers, flashing timers, musical toothbrushes that sing for 2 min, so use whatever it takes.

7.  Pick Your Flavor
Some kids can be very picky about the toothpaste flavor.  Some really hate mint (they think the tingle is “spicy”).  If necessary, let them try all the flavors they want.  Whatever it takes to get them to brush.

8.  Brush After Acidic Foods
Acid is what attacks the enamel, leading to decay.  If you give your kids anything particularly acidic, make a special case of brushing right after.  For example, I have a close friend who is an extreme “natural/health food” practitioner and gave their first-born lots of vitamin C, in liquid and chewable form.  (Vitamin C is a strong acid.)  The child had massive tooth decay by age 2 and had to get his baby teeth extracted.  So if your little guy likes to suck on lemons, eat citrus, or you give him chewable vitamin C, make a point of brushing right after.

9.  Use Fluoride*
Fluoride prevents tooth decay.  Use fluoride toothpaste: no more than a ‘smear’ or ‘rice-size’ amount of fluoridated toothpaste for children under three years old, and no more than a ‘pea-size’ amount of fluoridated toothpaste for children aged three to six.  Even the “natural” toothpastes  use fluoride.  You don’t want your kids to swallow too much fluoride, but if they swallow a bit, do not panic, a little bit it actually beneficial.  Any negative effects of swallowing fluoride can only come from cumulative over-ingestion — in other words it has to build up over time.  Remember: most municipalities add fluoride to the water, so you and your kids have likely been drinking it for years.  When the child is old enough to not swallow it, begin using a fluoride rinse like ACT Kids.

More on Fluoride:
Fluoride is a natural mineral found abundantly in water, soil and rocks throughout the Earth’s crust.  Fluoride prevents tooth decay in two ways: First, it prevents the bacteria in plaque from forming acids that erode the tooth enamel and cause decay. Second, in areas of the teeth that have already been damaged by acids, fluoride builds up in the weakened areas and begins to strengthen, or remineralize, the teeth.  Read more about fluoride at Medical News Today and American Chemical Society.

*In some alternative “natural/health” circles fluoride is considered bad.   Some people think that fluoride is part of a global conspiracy to poison us all.  Mommy Perfect isn’t here to litigate the merits of these theories.  If you feel strongly that fluoride is bad, then do what you think is best for you and your children.  Evidence overwhelmingly supports the use of fluoride to prevent tooth decay, which is the point of this article.  Feel free to comment below if you have strong opinions about this matter.  Even if you don’t approve of fluoride, I hope you adopt the other points above.

Disclaimer: this article may contain affiliate links.

Best (easy) Baked Beans Ever

Published Friday, August 21st, 2015

bakedbeans

By Gidget Fraser

This is exactly what the title says: the best and easiest baked beans you’ll ever make.  Guaranteed to be most popular side dish at the BBQ.  There might be tastier recipes out there that require overnight soaking of beans, or make-your-own-BBQ-sauce-from-scratch, but I still doubt it.

*Sweet Baby Rays doesn’t pay me to say this.  I recommend their original sauce because its the best combination of heat and sweet while being soy-free.  Besides, too many BBQ sauces contain soy sauce, which I’m allergic to.


Grandma’s Olde Tyme Oatmeal Pancakes

Published Tuesday, August 18th, 2015

OatmealPancakes

This is actually my grandmother’s oatmeal pancake recipe (not hyperbole).  She made this every Sunday morning for decades.  Its one of those really great recipes that everybody loves.

By Grandma Fraser